As I have worked on various projects at Etsy, I have accumulated a suite of functions that help me quickly produce tables and charts that I find useful. Because of the nature of iterative development, it often happens that I reuse the functions many times, mostly through the shameful method of copying the functions into the project directory. I have been a fan of the idea of personal R packages for a while, but it always seemed like A Project That I Should Do Someday and someday never came. Until…
Etsy has an amazing week called “hack week” where we all get the opportunity to work on fun projects instead of our regular jobs. I sat down yesterday as part of Etsy’s hack week and decided “I am finally going to make that package I keep saying I am going to make.” It took me such little time that I was hit with that familiar feeling of the joy of optimization combined with the regret of past inefficiencies (joygret?). I wish I could go back in time and create the package the first moment I thought about it, and then use all the saved time to watch cat videos because that really would have been more productive.
This tutorial is not about making a beautiful, perfect R package. This tutorial is about creating a bare-minimum R package so that you don’t have to keep thinking to yourself, “I really should just make an R package with these functions so I don’t have to keep copy/pasting them like a goddamn luddite.” Seriously, it doesn’t have to be about sharing your code (although that is an added benefit!). It is about saving yourself time. (n.b. this is my attitude about all reproducibility.)
(For more details, I recommend this chapter in Hadley Wickham’s Advanced R Programming book.)
Step 0: Packages you will need
The packages you will need to create a package are devtools and roxygen2. I am having you download the development version of the roxygen2 package.
install.packages("devtools")
library("devtools")
devtools::install_github("klutometis/roxygen")
library(roxygen2)
Step 1: Create your package directory
You are going to create a directory with the bare minimum folders of R packages. I am going to make a cat-themed package as an illustration.
setwd("parent_directory")
create("cats")
If you look in your parent directory, you will now have a folder called cats, and in it you will have two folders and one file called DESCRIPTION.

You should edit the DESCRIPTION file to include all of your contact information, etc.
Step 2: Add functions
If you’re reading this, you probably have functions that you’ve been meaning to create a package for. Copy those into your R folder. If you don’t, may I suggest something along the lines of:
cat_function <- function(love=TRUE){
    if(love==TRUE){
        print("I love cats!")
    }
    else {
        print("I am not a cool person.")
    }
}
Save this as a cat_function.R to your R directory.
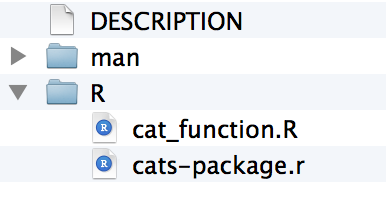
(cats-package.r is auto-generated when you create the package.)
Step 3: Add documentation
This always seemed like the most intimidating step to me. I’m here to tell you — it’s super quick. The package roxygen2 that makes everything amazing and simple. The way it works is that you add special comments to the beginning of each function, that will later be compiled into the correct format for package documentation. The details can be found in the roxygen2 documentation — I will just provide an example for our cat function.
The comments you need to add at the beginning of the cat function are, for example, as follows:
#' A Cat Function
#'
#' This function allows you to express your love of cats.
#' @param love Do you love cats? Defaults to TRUE.
#' @keywords cats
#' @export
#' @examples
#' cat_function()

cat_function <- function(love=TRUE){
    if(love==TRUE){
        print("I love cats!")
    }
    else {
        print("I am not a cool person.")
    }
}
I’m personally a fan of creating a new file for each function, but if you’d rather you can simply create new functions sequentially in one file — just make sure to add the documentation comments before each function.
Step 4: Process your documentation
Now you need to create the documentation from your annotations earlier. You’ve already done the “hard” work in Step 3. Step 4 is as easy doing this:
setwd("./cats")
document()
This automatically adds in the .Rd files to the man directory, and adds a NAMESPACE file to the main directory. You can read up more about these, but in terms of steps you need to take, you really don’t have to do anything further.

(Yes I know my icons are inconsistent. Yes I tried to fix that.)
Step 5: Install!
Now it is as simple as installing the package! You need to run this from the parent working directory that contains the cats folder.
setwd("..")
install("cats")
Now you have a real, live, functioning R package. For example, try typing ?cat_function. You should see the standard help page pop up!

(Bonus) Step 6: Make the package a GitHub repo
This isn’t a post about learning to use git and GitHub — for that I recommend Karl Broman’s Git/GitHub Guide. The benefit, however, to putting your package onto GitHub is that you can use the devtools install_github() function to install your new package directly from the GitHub page.
install_github('cats','github_username')
Step 7-infinity: Iterate
This is where the benefit of having the package pulled together really helps. You can flesh out the documentation as you use and share the package. You can add new functions the moment you write them, rather than waiting to see if you’ll reuse them. You can divide up the functions into new packages. The possibilities are endless!
Additional pontifications: If I have learned anything from my (amazing and eye-opening) first year at Etsy, it’s that the best products are built in small steps, not by waiting for a perfect final product to be created. This concept is called the minimum viable product — it’s best to get a project started and improve it through iteration. R packages can seem like a big, intimidating feat, and they really shouldn’t be. The minimum viable R package is a package with just one function!
Additional side-notes: I learned basically all of these tricks at the rOpenSci hackathon. My academic sister Alyssa wrote a blog post describing how great it was. Hadley Wickham gets full credit for envisioning that R packages should be the easiest way to share code, and making functions/resources that make it so easy to do so.

I guess you probably need @export in the document.
Thanks! Added
#’ @export
should be
#’ @export
(at least on my machine)
Well, the blog formatting killed the difference. Anyway, the quote should be like the other ones 🙂
gah, thank you!! let me know if you run into any other roadbumps 😀
“setwd(“./cats”) # this is Mac/Linux specific”
Windows R will accept the Mac/Linux notation for paths, so this statement will work there as well.
ah excellent! I’m not sure why I thought that wouldn’t work.. fixing now!
Really helpful post.
Don’t forget R CMD check, or the ghost-of-archived-CRAN-packages past will haunt you for eternity
While developing your package you only need to do load_all(“cats”) to make the functions available to your current R session – the install step isnt needed, and load_all is quicker. You should always document() and run some of the check_* routines before publishing or sharing the code.
How does cat-package.r fit into the picture i.e. what goes in it and what’s it used for?
ah good question! gonna add to the post — it is auto-generated, I’m not sure what it does tbh
It’s not necessary, but it’s good practice. It is just a place for package-level documentation, which is displayed if someone enters `?cats`.
Ah thanks!!
Thanks a lot, I’m much less intimidated by the whole process now 🙂
😀 😀 😀
Thanks for posting. Very helpful. You made it sound so easy, I had to try it … and it worked! One stumbling point for me was that I had also to download and install Rtools 3.1 from http://cran.r-project.org/bin/windows/Rtools/ and then run find_rtools().
I also have a related question. When I write a function, I use # comments within the function. I notice that when the function is incorporated as part of a package, those internal comments are eliminated. I looked at some functions from other packages, and noticed that they, too, had no internal comments. Do you know if there’s a way to include internal comments in a function in a package?
The internal comments are deleted when printed from a package. Notably ” Loading code from a package (by default) discards the source code, and the function listing is re-created from the parse tree of the function.”
See http://cran.r-project.org/doc/manuals/r-devel/R-exts.html#Tidying-R-code
Thanks for this very useful post. I also had the idea that a good way of working was to create personal packages, but thought it was too difficult. Now I see how easy it is!!
Thanks a lot for this post!
This is great! Thank you!
This turned out to be a little tricky for me, so I have less regret in my joygret…
As a commenter above mentioned, I first had to install Rtools. But in order to get the roxygen2 package to build I also had to remove a setwd() command from my Rprofile.site file as identified here: https://github.com/hadley/devtools/issues/117
I think these are both Windows-specific issues.
This is completely awesome! I went from not even considering it to finishing my first package (with mods based on some time poking around the rxoygen2 docs), all inside a few hours.
You ROCK.
I ended up spending most of the time screwing around with the documentation. I found that using the \href to have a named linked caused warnings when I ran check(), but \url didn’t. No idea why. I also noticed that when I had a few version changes while R Studio was open, I got some wonky behavior. But shutting down R and reinstalling it in a new session worked.
One thing I wanted to add but didn’t find after about 30 minutes of poking around the interwebs was the key for adding “Values” to the documentation (i.e., comments on the outputs of the function) through roxygen (e.g., like the @param key). I did see how to modify it in the .Rd file but was wondering if you have found a way to add those through the roxygen comment section?
You’re looking for @return
This is my go-to quick reference for getting from zero to package. Then I have Hadley’s docs for when I need details. Thanks!
I noticed one thing as I was doing mine: you can actually document your package with document(“cats”) rather than changing your working directory to “./cats” and calling document() without arguments. Saves the calls to setwd().
Nice! ❤ not changing the wd when I don't have to.
Thank you very much for this, nice simple beginner tutorial.
I have a quick related question — I did google it first, I promise.
Once you muster the courage to build your own package and put it on GitHub as in Step 6, people might download it with `install_github(‘user/cats’)`.
When that happens, a message on screen says `”Downloading master.zip from https://github.com/user/cats/archive/master.zip“`.
My question is this: does devtools call some GitHub API that creates this archive folder on the fly and populates with master.zip as of the latest incarnation of your package, or do you have to always create it at the git command line with `$ git archive –format zip –output archive/master.zip master`?
The latter seems like a huge repetitive chore that you have to do every time you tinker with your package and make a new commit.
By now I have written / am writing two R packages, which I host on GitHub, and I never had to manually create the master.zip file, so I assume it’s automatically created by GitHub after each commit to the master branch or something.
Anyways: You don’t have to do anything besides pushing it all to GitHub.
Good to know. Thank you. I wish comment threads had a “resolved” button.
I did it! Amazing. Thanks for the post. I’ve been meaning to make my personal functions file into a package, and this was the post I needed! Minnesotans stick together!
The content is really gr8!!!….I could also suggest that you could use RStudio which gives you a UI to create the packages in R and also do all the necessary checks before creating the package zip file:)
Thank you so much for this! I’ve read several other guides on using roxygen2, all of which were fairly illegible. 🙂 I was finally able to make it work with your directions!
When you figured out how to push the R package to github, did you run across any good documentation? I keep getting errors, I’m sure it’s something simple that’s giving me a head ache. By the way, thanks for your blog. It was very helpful for me. I just need to figure out how to push to github now.
Awesome! Someone pointed me to this intro for git/github that looks good: https://github.com/jlord/git-it#git-it
This is awesome! Thanks for posting this. I was just thinking today, I need to make a package but if only I could incorporate github!
awesome!!!!!!!!!
Thanks, with your help that pesky documentation was easy.
Thanks. I used this along with http://cran.r-project.org/web/packages/helloJavaWorld/vignettes/helloJavaWorld.pdf to get myself started with rJava
After step 1, on Windows the man directory was not created, was created in step 2 using document()..
Thanks, did not think it was this easy…
Brilliant. Just followed your instructions and it all worked. Thank you.
Reblogged this on sonofbluerobot.
Reblogged this on I'm a stranger myself here..
Thanks a lot – just built my first package and it was super easy following your instructions. Kudos to you!